Saptak's Blog Posts
Adding CSP hashes for styles in Chromium
Posted: 2021-01-17T14:13:55+05:30Content Security Policy (or CSP) is a way of avoiding certain types of website-related attacks like cross-site scripting and malicious data injections. It is a way by which website developers can tell the browser what content origins are approved so that everything else is blocked. One needs to add a Content-Security-Policy HTTP header mentioning the sources which they allow for loading scripts, styles, images, etc.
To read in detail about CSP, check Content Security Policy Level 3 working draft.
We are going to discuss here why sha256 hashes often don't let inline styles to not pass in chromium browsers. Chromium browser console complains about the style-src hashes mismatch even though it shows them to be the same. Why? And how to solve it?
TL;DR: If using <style>, use style-src. If using style="" attribute in HTML tag, use style-src-attr
Now, if you are interested in more information, let's dive a little deeper into what's going on.
Hashes to allow inline styles & scripts
The usual practice of having a tight, secure CSP is to not allow any inline style or inline scripts. This helps mitigate malicious scripts entered via data injection from getting executed.
When I say inline scripts, one might understand 2 different scenarios:
<!-- Scenario 1 -->
<script>alert('Hello world');</script>
or
<!-- Scenario 2 -->
<button onclick="alert('Hello world');">
    Click me!
</button>
Now, the easiest way to allow this would be to add unsafe-inline in script-src of the CSP. But then we are back to the problem of executing malicious scripts entered by data injection. There are two ways to still allow only these scripts to work: nonce and sha256 hashes. We are going to talk about sha256 hashes here.
The idea is to get the sha256 hash of the entire script and add it to the script-src. So in this case, it would be something like this:
script-src 'self' 'sha256-DUTqIDSUj1HagrQbSjhJtiykfXxVQ74BanobipgodCo='
You can get the hash from https://report-uri.com/home/hash. Also, chromium browsers will usually show the hash that should be added for a particular inline script.
The Problem
Now, all this sounds good, and in Firefox, just adding the above to your CSP will make both the scripts to work. However, in chromium, the above CSP will work only in Scenario 1 but not in Scenario 2. You can read more about the discussion here: https://bugs.chromium.org/p/chromium/issues/detail?id=546106#c8
In JavaScript, I think in general scenario 1 will be much more encouraged than scenario 2. So scenario 2 might not be encountered that often. However, the situation changes, when it comes to styles (or CSS)
In case of inline styles, following are the scenarios:
<!-- scenario 1 -->
<style>p{color: blue;}</style>
and
<!-- scenario 2 -->
<p style="color: blue;">This is a text</p>
In CSS, the second scenario is much more common when someone does inline styles than scenario 1. But again, in this case, adding a sha256 hash to style-src won't execute the scenario 2 in chromium browsers.
This is because styles added in scenario 2 are part of the style attribute in the HTML tag which in CSP terms are essentially event handlers. According to w3c CSP draft, the hash in style-src allows the inline styles mentioned inside <style> tag to pass but doesn't allow event handlers (as is the case in scenario 2). There's more on this discussion here.
So it's a feature?
Yes, it is a feature. In chromium browsers, adding a hash to style-src only allows any inline style written inside the <style> tags to execute. This is by design. If you need to execute the inline styles present in style= attribute of HTML tags, you need to use another directive in CSP called style-src-attr. Similarly, script-src-attr should be used if you are doing JavaScript event handling in the HTML tag itself.
So, for example, if you want to only allow an inline CSS such as this:
<p style="color: blue;">This is a text</p>
all you need to do is put the sha256 hash in style-src-attr along with 'unsafe-hashes'. This will tell the browser to allow any inline style, with the hashes that you added in style-src-attr to be executed.
So the CSP will have something like this:
style-src-attr 'unsafe-hashes' 'sha256-C8uD/9cXZAvqgnwxgdb67jgkSDq7f8xjP8F6lhY1Gtk='
And, that's it! That will do the trick in any chromium browser. The related code for chromium can be found here. According to caniuse.com, all chromium browsers above 75 supports this behaviour.
Even though firefox still doesn't have support for style-src-attr but it allows inline styles and scripts of all types to pass based on style-src and script-src hashes. So as long as the hash is mentioned in both style-src and style-src-attr, it should work in most of the browsers.
As for the explanation behind why 'unsafe-hashes', there is a pretty good explainer document written by andypaicu talking about exactly this.
Also, read more about style-src-attr in detail in the w3c draft to understand exactly what's happening and what kind of risk it may still pose.
PS: Inline JavaScript event handlers using script-src-attr can be very risky given an attacker can trigger a passing javascript from within an unrelated HTML tag.
Configuring Jest with React and Babel
Posted: 2019-08-26T11:38:00+05:30But the problem appears when we try to write Jest and Enzyme tests with them. Because Babel can now longer understand and parse the imports. And without Babel parsing them and converting to ES5, jest cannot test the components. So we actually need a mix of Babel configuration and Jest configuration.
Note: This post assumes you already have jest, babel-jest and babel/plugin-transform-modules-commonjs packages installed using your favorite javascript package manager.
Basically, the workaround is first we need to resolve the cleaner imports into the absolute paths for the import using Jest configurations, and then use the Babel configurations to parse the rest code (without the modules) to ES5.
The configuration files look something like these:
babel.config.js
module.exports = api => {
  const isTest = api.env('test');
  if (isTest) {
    return {
      presets: [
        [
          '@babel/preset-env',
          {
            modules: false,
          },
        ],
        '@babel/preset-react',
      ],
      plugins: [
        "@babel/plugin-transform-modules-commonjs",
      ],
    }
  } else {
    return {
      presets: [
        [
          '@babel/preset-env',
          {
            modules: false,
          },
        ],
        '@babel/preset-react',
      ],
    }
  }
};
jest.config.js
module.exports = {
  moduleNameMapper: {
    '^~/(.*)$': '<rootDir>/path/to/jsRoot/$1'
  }
}
So let's go through the code a little.
In babel.config.js, we make a check to see if the code is right now in test environment. This is helpful because
- Jest sets the environment to "test" when running a test so it is easily identifiable
- It ensures that the test configuration don't mess up with the non test configurations in our Webpack config (or any other configuration you are using)
In the test configuration for Babel, we are using a plugin "@babel/plugin-transform-modules-commonjs". This is needed to parse all the non component imports like React, etc. along with parsing the components from ES6 to ES5 after jest does the path resolution. So it helps to convert the modules from ES6 to ES5.
Now, let's see the jest.config.js. The jest configuration allows us to do something called moduleNameMapper. This is a very useful configuration in many different usecases. It basically allows us to convert the module names or paths we use for module import to something that jest understands (or in our case, something that the Babel plugin can parse).
So, the left hand part of the attribute contains a regular expression which matches the pattern we are using for imports. Since our imports look something like '~/path/from/jsRoot/Component', so the regular expression to capture all such imports is '^~/(.*)$'. Now, to convert them to absolute paths, we need to append '<rootDir>/path/to/jsRoot/' in front of the component path.
And, voila! That should allow Jest to properly parse, convert to ES5 and then test.
The best part? We can use the cleaner imports even in the .test.js files and this configuration will work perfectly with that too.
Making cleaner imports with Webpack and Babel
Posted: 2019-08-10T12:30:00+05:30But a better, more cleaner way of writing ES6 imports is
This hugely avoids the bad relative paths for importing depending on where the component files are. Now, this is not parse-able by babel itself. But you can parse this by webpack itself using it's resolve attribute. So your webpack should have these two segments of code:
and
The {modules: false} ensures that babel-preset-env doesn't handle the parsing of the module imports. You can check the following comment in a webpack issue to know more about this.
Ticket Ordering and Positioning (Front-end)
Posted: 2017-06-21T13:52:00+05:30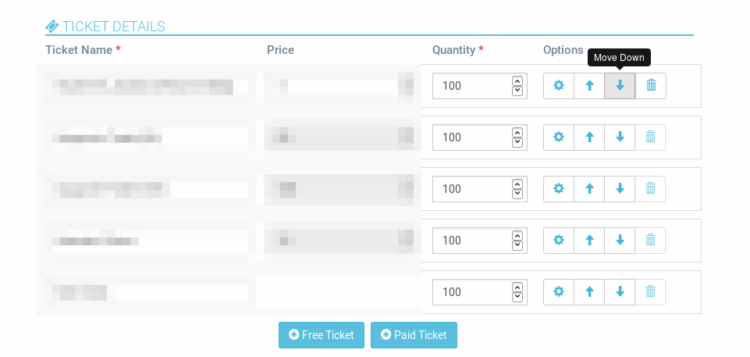
As discussed in my last blog about ticket ordering and positioning, in this blog we are gonna talk about how we implement the front-end part of re-arranging the tickets. We essentially do it using compute and methods of Vue.js. The functionality that is expected in the front-end is, the event organizer should be able to move the tickets Up or Down the order and save that position so that it gets displayed later in that very particular order.
Like I said above we use two main things of Vue.JS for this purpose - Compute and Methods.
Compute
We use this to get the sorted list of tickets based on the position key of the tickets and use this sorted list to display the tickets in the event editing wizard. Whenever you change the value of the position for a ticket, it automatically updates the list to sorted list again and hence the order of ticket in the front-end also updates. To add a compute function in Vue.JS, inside the new Vue() object creation, we add an attributecomputed and inside that we put all the functions that we are gonna use. So in our case the function is sortedTickets . We make use of the sort function of lodash to sort the tickets array based on it's position attribute.
Now while showing or looping over the tickets, we loop over
sortedTickets rather than the original ticket array.Method
This method is called when the button is clicked to move it up or down. This makes the calculations to determine the values of the position of the two tickets which are being re-ordered in a single click. To add a method, we do it in a similar way like computed but usingmethods attribute instead. The methods we have written to move tickets up or down is moveTicket.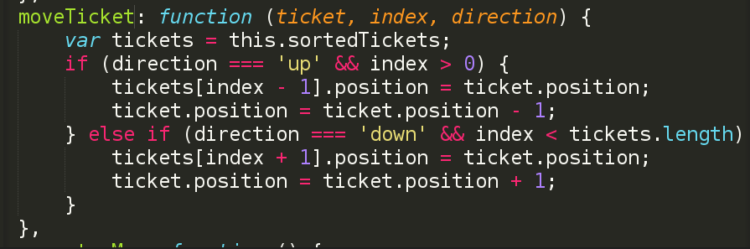
It has 3 parameters - ticket, index and direction. So when this function call is emitted, depending on the button, the direction is either "up" or "down" while the other two parameters are the ticket properties of the particular ticket. So in this function we check the direction and accordingly update the value of position for the tickets involved in the arranging. As we update the position here, because of the compute, the UI automatically updates to show the tickets in the new order.
Finally after all arrangement is done, the position is always saved in a hidden input field which is then passed as form data and is saved in the database so that the position value can be used in other pages for showing the ticket in order.