Posted: 2020-05-03T01:22:50+05:30
I understand that the title of this post is a little confusing. Recently, while working on the Projects API in Weblate, I came across an interesting issue. The Projects API in Weblate allowed you to get an attribute called source_language. Every project has only one source_language and in the API, it was a read-only property.
{
  "name": "master_locales",
  "slug": "master_locales",
  "web": "https://example.site",
  "source_language": {
    "code": "en",
    "name": "English",
    "direction": "ltr",
    "web_url": "http:/example.site/languages/en/",
    "url": "http://example.site/api/languages/en/"
  },
  "web_url": "http://example.site/projects/master_locales/",
  "url": "http://example.site/api/projects/master_locales/",
  "components_list_url": "http://example.site/api/projects/master_locales/components/",
  "repository_url": "http://example.site/api/projects/master_locales/repository/",
  "statistics_url": "http://example.site/api/projects/master_locales/statistics/",
  "changes_list_url": "http://example.site/api/projects/master_locales/changes/",
  "languages_url": "http://example.site/api/projects/master_locales/languages/"
}
As you can see, unlike the other relational fields, it's not a HyperLinkedIdentityField. It uses the nested language serializer to show all the attributes of the source_language.
Now, previously, when a project was created via API, a default language was always assigned to the project and there was no way to define the source_language while creating the project via API.
Problem?
Doing GET on Language Serializer when sending POST on Project Serializer
So we needed to add the feature to define the source_language of the project when we send a POST request to the Project API. And also edit the project via API to update the source_language. So, to use the same serializer, the request body for the POST request would look something like this:
{
  "name": "master_locales",
  "slug": "master_locales",
  "web": "https://example.site",
  "source_language": {
    "code": "ru",
    "name": "Russian",
    "direction": "ltr",
  }
}
Now, in general, we would have a python serializer like this:
class LanguageSerializer(serializers.ModelSerializer):
    web_url = AbsoluteURLField(source="get_absolute_url", read_only=True)
    class Meta:
        model = Language
        fields = ("code", "name", "direction", "web_url", "url")
        extra_kwargs = {
            "url": {"view_name": "api:language-detail", "lookup_field": "code"}
        }


class ProjectSerializer(serializers.ModelSerializer):
    source_language = LanguageSerializer(required=False)
    # ...
    # Other parts of the serializer
The problem with having code like this is, when the ProjectSerializer gets a request like shown above and tries to validate the data in the request, it also validates the LanguageSerializer part. The LanguageSerializer part whenever it gets data, it will automatically try to validate the data. The code property of Language model has a unique constraint. So, when LanguageSerializer tries to validate
{
    "code": "ru",
    "name": "Russian",
    "direction": "ltr",
}
it will throw an error "This field must be unique" for code property in case a language with codename ru already exists in the database.
Solution
So there are few steps to get this done.
Remove validators from code field
extra_kwargs = {
    "url": {"view_name": "api:language-detail", "lookup_field": "code"},
    "code": {"validators": []},
}
Add "code": {"validators": []} to the extra_kwargs to remove the validator from the LanguageSerializer on every data request it receives.
Add manual validation for code field
Removing validator will also remove the validation while doing POST request. Now, the LanguageSerializer in Weblate specifically doesn't support POST, but in any case, you would manually need to add a validation function to the LanguageSerializer so if someone checks for validity before adding language, it throws an error. To do that, add a function validate_code like this:
def validate_code(self, value):
    check_query = Language.objects.filter(code=value)
    if check_query.exists() and not (
        isinstance(self.parent, ProjectSerializer)
        and self.field_name == "source_language"
    ):
        raise serializers.ValidationError(
            "Language with this Language code already exists."
        )
    if not check_query.exists():
        raise serializers.ValidationError(
            "Language with this language code was not found."
        )
    return value
Note: The name of the function must be validate_{field_name} when you are trying to validate a field based on how DRF handles validation.
Overwrite create() in ProjectSerializer
Finally, we would want to overwrite the create() function of ProjectSerializer to:
- Validate
source_language data using the above validation to check if the language with that code exists
- Modify
source_language key of the validated_data to have the Language model object rather than the dictionary, so it can be used to create a project with the foreign key.
- Lastly, create a project with the new
validata_data
The code would look something like this:
def create(self, validated_data):
    source_language_validated = validated_data.get("source_language")
    if source_language_validated:
        validated_data["source_language"] = Language.objects.get(
            code=source_language_validated.get("code")
        )
    project = Project.objects.create(**validated_data)
    return project
And now, if you create a project, using the source_language key, you can define the source language for the project while using the Project API. There might be several other ways to go about it. But this is one of the ways I found works.
Also, this feature is now live in Weblate 4.* versions which allows you to define the source_language via the API.
Posted: 2016-09-29T18:01:00+05:30
Google map is one of the most widely used API of Google as most of the websites use Google map for showing address location. For a static address it's pretty simple. All you need to do is mention the address and the map will show the nearest location. Problem arrives when the address is dynamically putted by the user. Suppose for an event in event organizer server, one enters the location. The main component used while taking input location is Google Autocomplete. But we went a step further and parsed the entire address based on city, state, country, etc. and allowed user to input the details as well which gave them the nearest location marked in Map if autocomplete couldn't find the address.
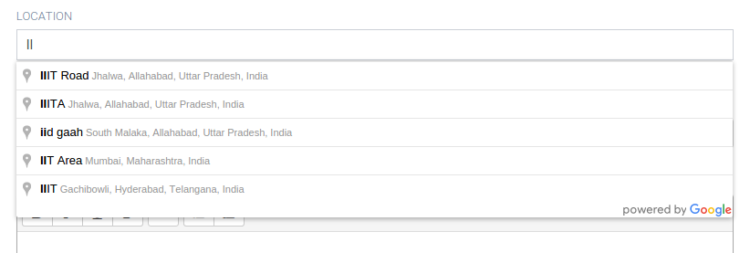
Autocomplete Location
As we can see, in the above input box we get suggestions by Google Map on entering first few letters of our address. To this, we need the API
https://maps.googleapis.com/maps/api/js?key=YOUR_API_KEY&libraries=places&callback=initMap. You can find an example code of how to do this
here.
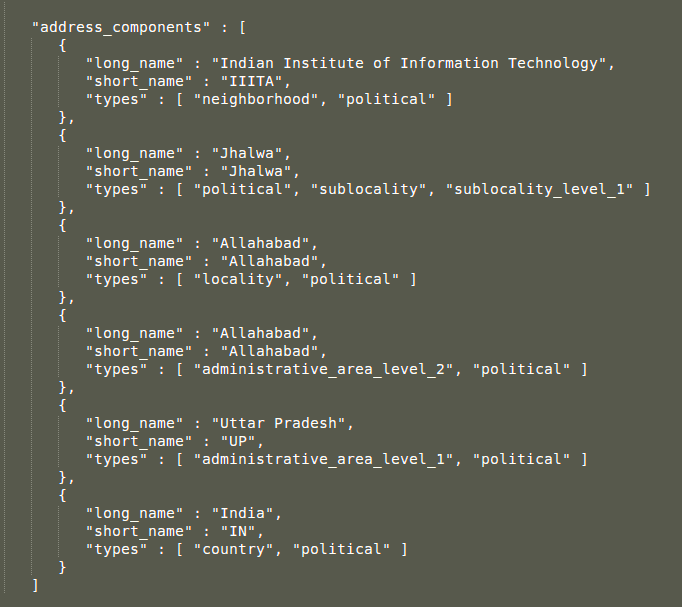
After this is done, what we wanted is not to just include this address, but to provide a form to fill up the entire address in case some parts were missing on this address. The function that the autocomplete listens to is "place_changed" . So once we click on one of the options, this event is triggered. Once the event is triggered, we use the autocomplete.getPlace() to get the complete address json. The json looks something like this:
Now what we do is we create a form with input fields having the id same as the ones we require(e.g., country, administrative_area_level_1, locality, etc.). After that we select the long_name or the short_name from this json and put the value in the corresponding input field with the ids. The code for the process after getting the json is elaborated
here.
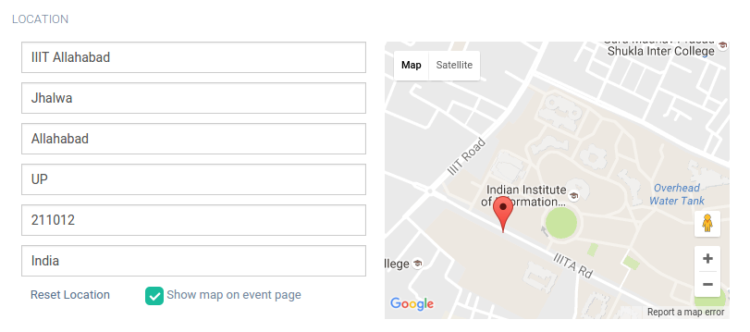
Editing Address Form
After doing this it looks something like this:
However, now the important part is to show the map according to this fields. Also, every time we update a field, the map should be updated. For this we use a hack. Instead of removing the initial location field completely, we hide the field but keep the binding to autocomplete intact. As a result the map is shown when we select a particular address.
Now when we update the fields in the address form, we append the value of this field to the value in the initial location field. Though the field is hidden but it is still bound to autocomplete. As a result as soon as we append something to the string contained in the field, the map gets updated. Also, the updated value gets stored to the DB. Thus, with every update in field, the pointer is moved to the nearest location formed by appending all the data from the form.
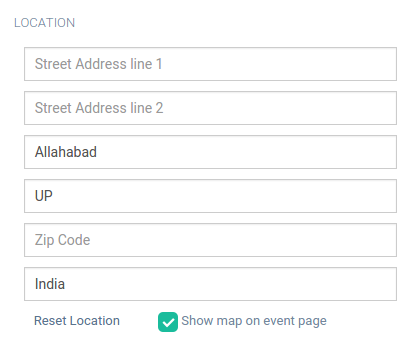
After saving the location data to DB, if we wish to edit it, we can get back the json by making the same request with the location value. And then we will get back the same address form and the map accordingly.
Finally it looks something like this:
Posted: 2016-07-09T16:47:00+05:30

One of the important features while creating server side code for some website/ web application is sending emails. But how do we send emails. There are different ways and packages using which you can setup SMTP ports and send emails. So why specifically sendgrid? Because along with SMTP relay, sendgrid also allows you to send emails using its Web API which makes work much easier. Here, we will discuss about using Web API.
 SendGrid’s Web API
 sends mail via HTTP. Your server sends a message to SendGrid, and receives either a 250 message, indicating that the message was accepted by the receiving server, or a 400 or 500 message, indicating that something is wrong, prohibiting us from processing the request.
When everything is packaged correctly, SendGrid can process the request and then send it to the intended recipient’s ISP that responds with either a 250 message or a 500 message of their own, informing SendGrid whether or not the message was received. This process is more similar to putting your package in the mailbox and letting the post office review its information and deliver it for you.
Some sample requests:
Authentication: curl -X "GET" "https://api.sendgrid.com/v3/templates" -H "Authorization: Bearer Your.API.Key-HERE" -H "Content-Type: application/json"
Requests:POST https://api.sendgrid.com/v3/templates/ HTTP/1.1
Content-Type: application/json
{
"name": "new template name"
}
Responses:HTTP/1.1 200 OK
Content-Type: application/json
{
"foo": "bar",
}
Errors:You can go through the various errors from this link: https://sendgrid.com/docs/API_Reference/Web_API_v3/How_To_Use_The_Web_API_v3/errors.html
An example request for email is:
Request:-
POST https://api.sendgrid.com/v3/mail/send HTTP/1.1
Request body:-
{
"personalizations": [
{
"to": [
{
"email": "john@example.com"
}
],
"subject": "Hello, World!"
}
],
"from": {
"email": "from_address@example.com"
},
"content": [
{
"type": "text",
"value": "Hello, World!"
}
]
}
Response:-
{
HTTP/1.1 202
}